How to play in tune on the Violin?
By Elaine Khong, October 2021
All too often we hear teachers instructing students “You are out of tune, you need to listen carefully to what you are playing !” What should we listen out for? Is it a matter of tuning our ears? It is ear training, and way more. This article will discuss the key building blocks to good intonation and playing in tune on the Violin. Using all these ‘building blocks' will make us a more secure player. The approach is to combine mental visualisation, music knowledge, good left hand posture and finally a listening ear.
1) Hear it before you sound it.
Good intonation comes primarily from inside the player’s head. If the player isn’t hearing the tune in his mind, it’s really not going to come out of the instrument right. Hearing the notes before you play is the first step toward good intonation.
Good intonation is something you can work on almost from Day One. A dedicated teacher will seek to impress upon the beginner student the importance of playing in tune. Playing in tune and in good rhythm is the most fundamental. If one is out of tune, there is really no point to just keep going further.
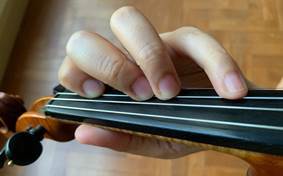
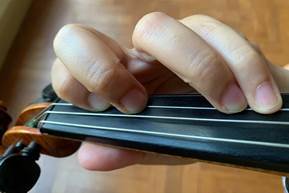
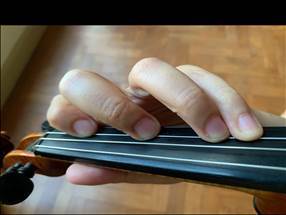
2) Put effort into developing a good left hand frame.
When the left hand posture is properly set up, playing in tune is half the battle won. Do not rush at this junction. Take time to understand how to position the left hand and fingers with ease and comfort. Experiment with different contact points of the left thumb with the neck of the violin, the left elbow under the violin, the placement of the fingertips on the fingerboard. When the fingers are in position, they are poised to tap down on the ‘right spot’, the hand is relaxed and void of tension, the fingers are curved and above their spot on the fingerboard. As the left hand and fingers are set up properly, it is more likely to be in tune, there will be less unnecessary movement and hence conserving energy. Where speed is required, the fingers will be nimble and quick.
3) Apply theory knowledge
The relationship between one note and the next is the interval between two notes. Suppose you know two notes are a minor 3rd apart, when tuning these two notes, you will listen out for the minor 3rd interval and be aware that the second note should not be too ‘sharp’. In another instance, where two notes are a Major 6th apart, one could listen out for the bright interval of a major interval.
4) Have a mind map of the Finger Patterns
As we have a mental map of the finger pattern that is needed for a particular passage, this helps us to visualise how to place the fingers beforehand. Hence, this thought process enables us to be one step ahead of the physical action of putting the fingers down, thus our playing and intonation can be more secure.
 |  |
 |  |
 |  |
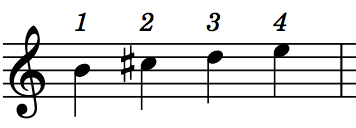
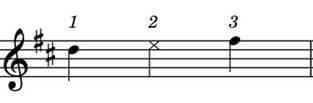
5) Check with open strings
In the example below , you may check the second note (D)
")
Paganini Cantabile (Bars 1 & 2)
with the open string by playing them together like this:
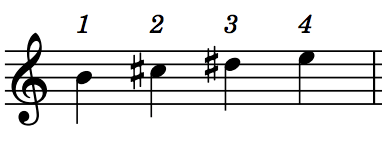
6) Use ‘Guide Notes’
‘To measure the right tuning of notes from the previous note, you not only judge by the relationship of the fingers to each other. When the playing fingers are not next to each other, you need to imagine the missing fingers.’ Simon Fischer, Basics
A good left hand frame will facilitate the fingers that are not being used to stay close to the strings, as they remain involved in the playing by measuring the distances accurately.
To help gauge accurately the distance between (D) (1st finger in 3rd position) and (F#) (3rd finger), we will use a intermediate guide note (E) (2nd finger)
(D) (F#)
Paganini Cantabile (Bars 1 & 2)
Place down the 2nd finger (E) as a guide note.
Copyright 2026 by ViolinJournal.com